Atlas Targets Configuration
Atlas Targets are an innovative way to empower Admins to utilize Atlas to change separate Splunk Environments. A 'Target' is another Splunk environment that is not on the local host's Search Head or Indexer Cluster. By setting up an Atlas Target, Splunk Admins, or other power users on Splunk, can utilize a Service Account to communicate with Splunk environments that the user is not immediately on. This is useful for Dedicated Search Head deployments, and Federated Search Heads connected to Splunk Cloud.
To fully leverage this capability, please review listed requirements, supported features, and follow the guide for implementation.
Capability Requirements to Use Atlas Targets
To leverage Atlas Targets, users configuring and utilizing the system need to have the 'list_storage_passwords capability' Splunk capability. This capability enables users to use saved and encrypted password used by the configured Service Accounts used by Atlas Targets. This is powerful capability enabling users to read any plain text secret in the Splunk ecosystem, such as user passwords. Its for this reason that utilizing Atlas Targets is recommended for Splunk Admins, who already have this capability, only. Atlas documentation reflects this recommendation.
What Features Leverage Atlas Targets?
This list will expand in future Atlas releases to reflect expanding capability dependent on the Atlas Targets system. For now, these Atlas Element features rely on both Atlas Target configuration and proper user capabilities:
- Scheduling Assistant: The Scheduling Assistant [BETA] dashboard utilizes Atlas Targets to enable Splunk Admins to change schedules, disable searches, and view searches on remote Splunk Systems. This capability was not present using Search Peers before this feature.
How to Configure Atlas Targets
Navigate to Atlas Core and ensure that the current user has Atlas Access, then navigate to Atlas Target Configuration which resides under the Configuration navigation collection.
Configuring a Target
To configure a new Atlas Target, select the Add Target button on the top right. A modal will appear that asks for inputs related to the Splunk Environment being added as an Atlas Target. It appears as such:
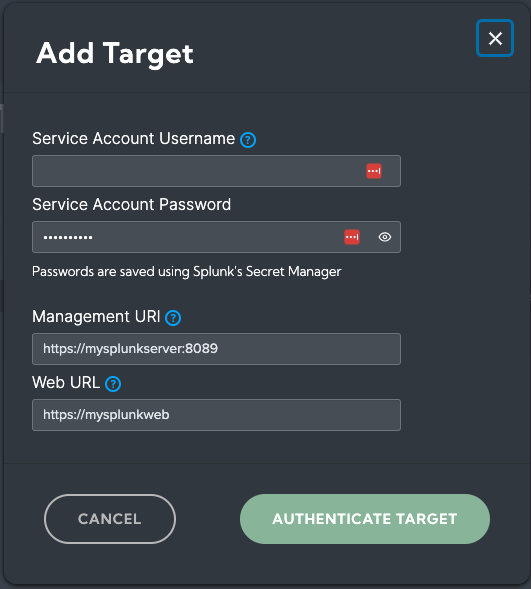
- Service Account Username: Account name for an admin-level service account on the target Splunk server. This account will be leveraged to perform tasks with the Atlas Product. All tasks are logged in the Atlas Audit log.
- Service Account Password: Account password for an admin-level service account on the target Splunk server. The password will be saved using Splunk's Secret Manager.
- Management URI: Management URI of the identified Splunk Target. The URI should include the server name (found on the About page on Splunk servers), and the management port number (default 8089).
- Web URL: URL of the identified Splunk Target. The URL will be used for navigating users to the correct Splunk Web UI when performing Atlas actions.
Select the Authenticate Target button. Atlas will now test the connection adn the Service Account details. If there are any issues, the error will present itself to the user.
After a successful test, the Target should now appear in the table. It is recommended to select Server Roles belonging to that Atlas Target by interacting with the Server Roles dropdown and selecting all relevant roles. Then selecting the Save Changes button to update the list.
Saved Targets can be removed by selecting the Trash icon button, however the target marked 'local' cannot be deleted.
By selecting the Edit icon button, Admins can change the Service Account information for an individual target after its been configured.