Install and Configure Atlas STIG Compliance
Solution Overview
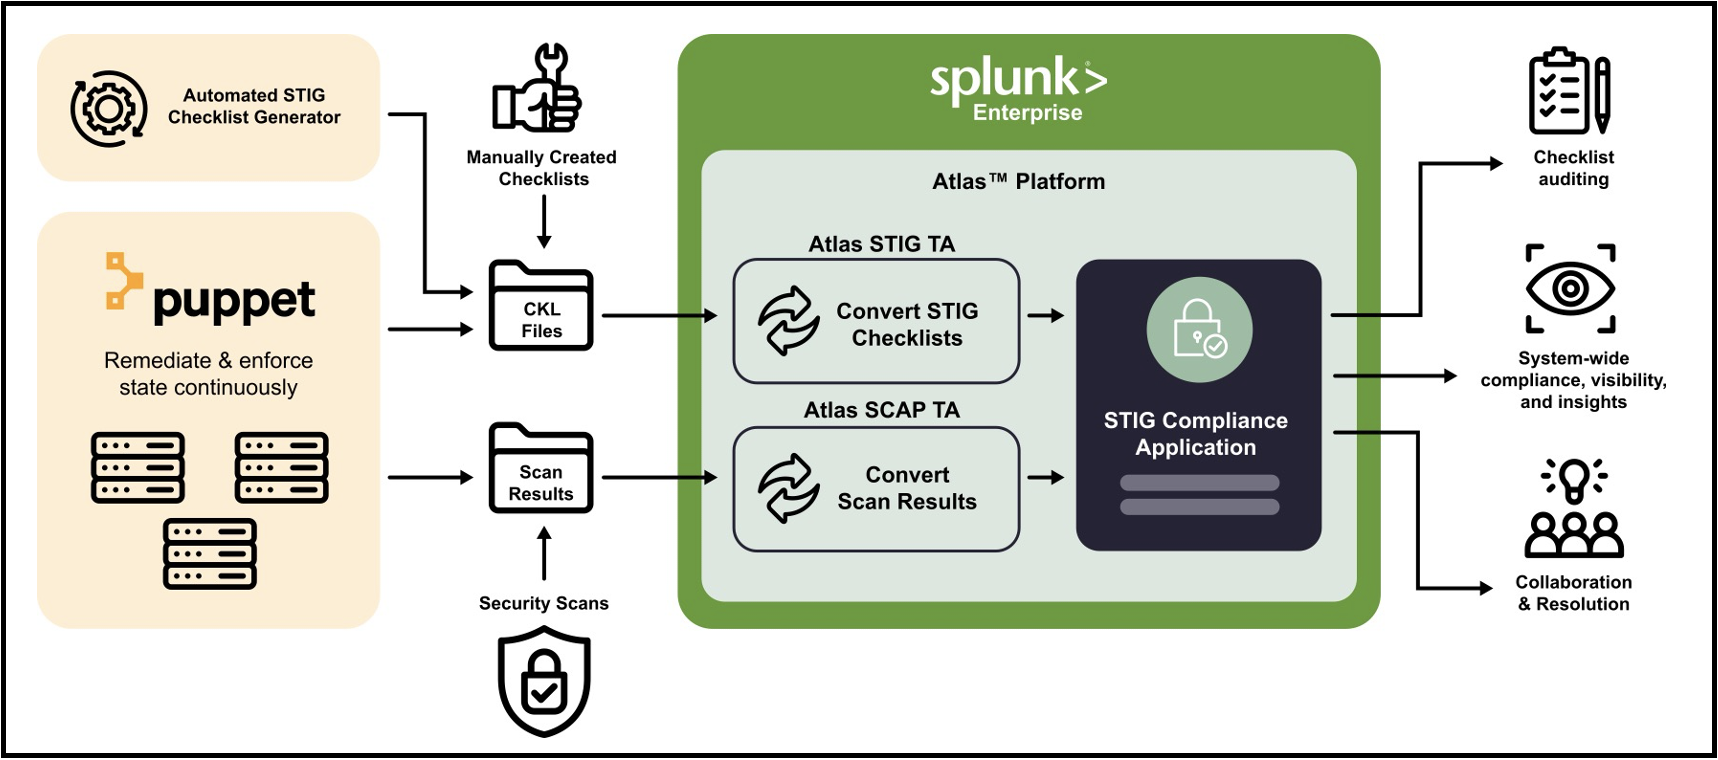
The Atlas STIG Compliance app relies on two core components to aggregate compliance data.
STIG Compliance Splunk App: Contains all necessary tools to correlate, visualize, and edit compliance related artifacts.
STIG Checklist Technical Add-on: Ingestion of STIG Checklists are performed using the Atlas STIG TA (Technology Add-on). This TA will process all desired checklist files from a given location, and automatically format them to be relevant to Splunk for use in the Atlas STIG Compliance app. It is required that users install both the Atlas STIG Compliance app, and its associated Atlas STIG TA on the Splunk search head which will be used to analyze compliance data.
Additionally, Atlas STIG Compliance contains features to incorporate results from common compliance scanning tools, such as SCAP. Results from compliance scans are ingested into Splunk in a similar manner as the checklist files and require a separate Atlas SCAP TA to correlate the data. There is an optional Puppet integration that can also provide STIG compliance automated scanning, remediation and enforcement of STIG vulnerabilities.
The following diagram illustrates how the components work together to make a comprehensive solution.
Concepts & Terminology
Certain terminology and concepts will be utilized throughout this documentation. It is important to understand these in order to effectively utilize the software and this documentation.
STIG: A System Technical Implementation Guide is made up of a list of vulnerabilities defined by DISA (Defense Information Systems Agency) that provide guidance for how an IT asset must be configured or managed to be compliant.
Target: A target is a computing resource such as a server, computer or network device that has STIGs being applied to it. A target can also be a non-computing resource as well. The DISA STIG Viewer tool allows users to specify a target name. This is typically a computer's hostname.
System: A collection of Targets that make up a logical system representing a users IT organization. These are defined in the STIG Compliance app so that you can organize your Targets into logical groups that represent your environment. A target can belong to multiple systems if desired.
STIG Checklist: A STIG checklist is an instance of a STIG that has been defined or assigned to a target.
SCAP: A Security Content Automation Protocol is a method for using specific standards to enable automated vulnerability management, measurement, and policy compliance evaluation of systems deployed in an organization
TA: Technology Add-on
Recommended Architecture
The Atlas STIG Compliance solution follows Splunk best practices in deploying its components to an existing system. The recommended approach is to install the STIG Compliance app as part of the Atlas Platform on the search tier. Additionally, the STIG TA and the SCAP TA should be installed on each component of the Splunk system (Including the Search Head). This can easily be achieved using a deployment server and is highly recommended for turn-key functionality. Refer to Splunk Documentation for additional detail on deploying Apps using a deployment server.
At a minimum, the TA for each data type needs to be present on each tier (Input, Parsing, Indexing, Search) that processes that data type. As an example, if STIG checklist data is only being stored and processed on the same machine hosting the Splunk Search Head, the STIG TA would only be required on that server. If, however STIG checklists are being stored on a remote datastore, that datastore is required to have forwarder with the STIG TA installed on it, and the STIG TA would additionally need to be installed on all associated Splunk Servers as part of that data path (Heavy Forwarders, Indexers, and/or Search Heads).
It should be noted that SCAP scans are typically generated on each machine locally. To automatically incorporate up to date SCAP data, each machine that generates SCAP scans should be equipped with a forwarder and the SCAP TA installed. To assist with integration, it is recommended that SCAP scans are output to a common location on each target machine. As seen in the following section, Ingesting Data, the SCAP TA must be configured to ingest data from a known file location. Creating a standard location for where SCAP data is stored on each machine allows the user to configure the SCAP TA once, then deploy it to every target.
Installation Checklist
| Task | Search Head | Indexing Tier | Forwarding Tier | Notes |
|---|---|---|---|---|
| Install Atlas | Yes | No | No | Only Required on the Search Head or Search Head Cluster Members |
| Install Technical Add-on (TA) on all Splunk instances that process STIG data | Yes | Yes | Yes | Required on every tier where STIG/SCAP data will be present (i.e. Search Head, Indexes, any machine Forwarding unprocessed .ckls or SCAP data) |
| Set up ingest source directory and create an Archive sub-directory | No | No | Yes | This needs to be present on each machine sending data to Atlas. Try to create a consistent location for each machine. It is recommended to create a directory where CKL files are placed (this is your source directory), and also to create an ‘Archive’ sub-directory for checklist files that have been processed. |
| Configure inputs.conf on TA | No | No | Yes | Set source and archive directory in script stanza. Set disabled=false for either Python3 or PowerShell version |
| Add STIG/SCAP indexes to index.conf | No | Yes | No | Index must match the index field in the inputs.conf of the STIG Compliance app |
| Place ckl files in ingest (source) directory | No | No | Yes | Location must match source directory defined in inputs.conf |
| Select Metric Index on Configuration dashboard | Yes | No | No | Requires Admin permissions |
Ingesting STIG Checklist Files into Splunk
In order to ingest STIG checklist files (.ckl or .cklb) into Splunk, a Splunk Forwarder with the Atlas STIG Checklist TA must be used. The Splunk Forwarder will identify the checklist files and will process them. Once the data has been indexed by Splunk the Atlas STIG TA will then move the checklist file to another folder so that it is not picked up again by the forwarder.
Atlas supports the ingest of both STIG Viewer 2 and STIG Viewer 3 files. (.ckl and .cklb file extensions)
The recommended implementation of this solution is to create a file share where users can drop a checklist file for the Atlas TA to process. This also can enable automated processes that will allow external systems to drop completed checklist files in a location so that the data can automatically be brought into Splunk.
There are two versions of the parsing script deployed at the forwarder that are used by the Atlas STIG TA, one for Python3 and another for PowerShell. Use the version most appropriate for your environment and ensure that all dependencies for both are present before attempting to ingest the data into Splunk.
Configure the STIG Checklist Technical Add-On
The process for updating the Atlas STIG Checklist TA configuration file is as follows:
Obtain the Atlas STIG TA software from the Atlas Download Site.
Unzip the file and move the contents of the Atlas STIG TA into the
/opt/Splunk/etc/appsdirectory if it is not already present.Copy the inputs.conf template from
/opt/splunk/etc/apps/<atlas_stig_ta>/default/inputs.confto a local directory:/opt/splunk/etc/apps/<atlas_stig_ta>/local/inputs.confThere are two stanzas present in the default
inputs.conf, one for a Python version of the checklist file parsing script and a second for the PowerShell version. Copy the stanza relevant to the platform you are running this TA on or leave the stanza you don't need commented.# Python - Based inputs example stanza
# [script://$SPLUNK_HOME/etc/apps/TA_atlas_stig/bin/stigparser.py /source /destination]
# disabled = false
# index = stig
# sourcetype = compliance:stig_ckl
# interval = 30
# python.version = python3
# PowerShell - Based inputs example stanza
#[powershell://Processes-STIGParser]
#script = . $SplunkHome\etc\apps\ta_atlas_stig\bin\stigparser.ps1 \source \destination
#disabled = false
#index = stig
#sourcetype = compliance:stig_ckl
#schedule = 30Edit the local version of the
inputs.conffile and uncomment the lines for the version of the STIG checklist ingestion script you want to use.# Python - Based inputs example stanza
[script://$SPLUNK_HOME/etc/apps/TA_atlas_stig/bin/stigparser.py /source /destination
disabled = false
index = stig
sourcetype = compliance:stig_ckl
interval = 30
python.version = python3
# PowerShell - Based inputs example stanza
[powershell://Processes-STIGParser]
script = . $SplunkHome\etc\apps\ta_atlas_stig\bin\stigparser.ps1 \source \destination
disabled = false
index = stig
sourcetype = compliance:stig_ckl
schedule = 30Source directory: The directory that will be scanned by the Splunk Forwarder where the .ckl files to be ingested into Splunk will be placed.
Destination directory: The directory where the processed ckl files will be placed after being processed by the Splunk Forwarder.
disabled: Defaults to false. Set the value to
truefor the stanza that should be enabled in your environment. Only one version of the script should be set to enabled.index: The Splunk index where the data will ingested. Use the default provided or modify for your environment.
sourcetype: The default Splunk source type for the compliance data being ingested. Do not change this field, use the default value provided.
interval: The interval that the scripted input will be executed. The default value is 30 seconds.
python.version Specifies the version of Python to be used. This is only relevant for the Python stanza. Modify if you are using a different version of Python.
Create a separate folder, called archive, within the directory where the checklist files will be placed. This will provide a place for the checklist files to land once they have been processed.
IMPORTANT: Ensure the system user that is running the Splunk universal forwarder service has read, write, and execute permissions on the file system.
Once final edits are made to the inputs.conf in the local directory, restart Splunk for the changes to take effect.
The STIG TA should automatically begin ingesting checklist files into Splunk if they exist in the specified 'source' directory.
Validating STIG Checklist Ingest Configuration
Method 1
You can validate that the TA is configured correctly by checking the defined 'destination' directory declared in the inputs.conf file. There will be checklist files present in this directory if the Splunk forwarder has processed them. Additionally, verify that you can search the new data by opening a new Splunk search window and searching the index and sourcetype specified in the inputs.conf file search: index=”stig” sourcetype=”compliance:stig_ckl”.
Method 2
A report named 'Data Collection' is included in the Atlas STIG Compliance user interface. Under Reports click on Data Collection. This report will display all of the STIG checklist files it has processed within the specified time range. Each STIG checklist file that has been processed will appear on this report. You can use this report for troubleshooting and validation for each checklist file. If there was an error processing a checklist, this should appear in the report as well.
Ingesting SCAP Scan Results into Splunk
Many of the SCAP content now output STIG checklist (.ckl) files. You should use these instead of the .xccdf files whenever possible.
In order to ingest SCAP scan results into Splunk, a Splunk Forwarder with the Atlas SCAP TA must be used. The Splunk Forwarder will identify the .xccdf files and will process them by converting them into a different format. Once the data has been indexed by Splunk the Atlas SCAP TA will then move the .xccdf file to another folder so that it is not picked up again by the forwarder. The recommended implementation of this solution is to create a file share where users can drop a .xccdf file for the Atlas TA to process. This also can enable automated processes that will allow external systems to drop completed .xccdf files in a location so that the data can automatically be brought into Splunk.
A configuration file must be modified which establishes the location of the raw .xccdf files to be ingested, along with options for where to store the processed files and the rate at which the TA will automatically process the files.
There is currently only one version of the SCAP parsing script that is available and it requires Python 3. A non-python version is not available, so this TA must deployed on machines that have the Python perquisites installed.
Configure the SCAP TA
The process for updating the Atlas STIG Checklist TA configuration file is as follows:
Obtain the Atlas SCAP TA software from the Atlas Download Site.
Install Python on the target node where the TA will be deployed if it is not already installed.
Unzip the file and move the contents of the Atlas SCAP TA into the
$SPLUNK_HOME/etc/appsdirectory if it is not already present.Copy the inputs.conf template from
$SPLUNK_HOME/etc/apps/<atlas_scap_ta>/default/inputs.confto a local directory:$SPLUNK_HOME/etc/apps/<atlas_scap_ta>/local/inputs.conf.There should be 2 stanzas present in the default
inputs.conf, one for a Python version of the .ckl file parsing script and a second for the PowerShell version. Copy the stanza relevant to the platform you are running this TA on or leave the stanza you don't need commented.# [script://$SPLUNK_HOME/etc/apps/TA_atlas_scap/bin/scapparser.py
/source/directory/goes/here /destination/directory/goes/here]
# sourcetype = compliance:scap_xccdf
# source = SCAP scan: Ingested from TA_atlas_scap
# interval = 30
# python.version = python3Edit the local version of the
inputs.conffile and uncomment the lines for the version of the STIG checklist ingestion script you want to use.[script://$SPLUNK_HOME/etc/apps/TA_atlas_scap/bin/scapparser.py /source /destination]
sourcetype = compliance:scap_xccdf
source = SCAP scan: Ingested from TA_atlas_scap
index = scap
interval = 30
python.version = python3noteThe line
index = scapmust be added to the templateinputs.conffile.Source directory: The directory that will be scanned by the Splunk Forwarder where the .xccdf files to be ingested into Splunk will be placed.
Destination directory: The directory where the processed .xccdf files will be placed after being processed by the Splunk Forwarder.
disabled: Defaults to false. Set the value to
trueto enable the TA in your environment.index: The Splunk index where the data will ingested. Use the default provided or modify for your environment. NOTE: This line must be added to the templated
sourcetype: The default Splunk sourcetype for the compliance data being ingested. Do not change this field, use the default value provided.
interval: The interval that the scripted input will be executed. The default value is 30 seconds.
python.version Specifies the version of Python to be used. This is only relevant for the Python stanza. Modify if you are using a different version of Python.
tipYou must create a separate archive folder within the directory containing the .xccdf files are dropped so that the scripted input can send processed .xccdf files to that folder. The script will not automatically create the directory; however it will warn the user that the 'processed file' directory is not found.
If implemented as suggested, an example configuration file might read:
[script://./bin/scapparser.py /home/SCAP /home/SCAP/archive]
Validating SCAP Configuration
Once final edits are made to the inputs.conf in the local directory, restart Splunk for the changes to take effect. The TA should automatically begin importing checklist files into Splunk if provided. You can validate that the TA is set up correctly by checking the defined 'Archived' directory declared in the inputs.conf file. There should now be checklist files present in this directory if the Splunk forwarder processed them. Additionally, verify that you can search the new data by opening a new Splunk search window and searching the index and sourcetype specified in the inputs.conf file search: index=”scap” sourcetype=”compliance:scap_xccdf”.
Dedicated STIG Compliance Indexes (Optional)
Atlas STIG Compliance provides users the ability to partition compliance data into individual indexes, which can be used to provide Splunk-native role based access controls to the data. To enable this, additional settings must be configured by editing the macros.conf file of the STIG Compliance Splunk App. This is an optional configuration and is not required if you do not need to restrict access to compliance certain compliance data.
Configuring Dedicated STIG Compliance Indexes
Setting dedicated indexes not only increases performance in large environments but can be used to set user permissions on the data, which is a Splunk native capability and is enforced on the indexing level. In environments that have one or more dedicated indexes for compliance data, you must set the index that Atlas STIG Compliance will search when retrieving Compliance data.
On the Search Head running Atlas STIG Compliance perform the following steps:
Copy the
macros.conftemplate from the location/opt/splunk/etc/apps/<atlas_stig_ta>/default/macros.confto a local directory:/opt/splunk/etc/apps/<atlas_stig_ta>/local/macros.confEdit the definition of the
[atlas_Compliance_indexes]stanza to search the appropriate indexes:- By default, Atlas STIG Compliance has the definition set to
(index=*), which will search all Indexes for relevant compliance data. - If adding multiple indexes the definition, separate each index with an
OR: definition = index=”Compliance_A” OR index=”Compliance_B”
- By default, Atlas STIG Compliance has the definition set to
Ensure that your Compliance Data is being stored in the correct index that Atlas STIG Compliance is now searching.
- Checks you can execute include:
- Indexes have been properly defined on Splunk’s
indexes.conffile - The TAs for STIG and/or SCAP are forwarding to the correct index, by setting their
inputs.conffile. The ‘index’ argument of the stanza being used should match your desired index.
- Indexes have been properly defined on Splunk’s
- Checks you can execute include:
Creating & Configuring Metric Indexes
Metric indexes are concise Splunk indexes that are updated with specifically formatted events. They do not count towards license utilization, while providing speed improvements. Atlas STIG Compliance utilizes a metric index to store historical vulnerability data used to populate Health Score trends visualizations on System Overview and System Compliance.
Follow standard Splunk guidance for creating a metric index, then navigate as an Admin to the STIG Compliance Configuration dashboard. Under the Settings section, select teh configured metric index and select Save Changes button. Vulnerability and Health Score data will now be periodically saved to the metric index, and will start to populate the following visualizations:
- Trend lines on System Tiles on System Overview dashboard
- Score Trend column on Target Summary Table on System Compliance dashboard