Using Splunk Migration Helper
Set Up Atlas Splunk Migration Helper
Set-Up Overview
Atlas Splunk Migration Helper has been designed for flexibility of installation configurations. The user has the option of installing Atlas Splunk Migration Helper on the Search Head of the environment which is planning to be migrated (henceforth referred to as the ‘Source’ environment), the environment which is being migrated to (referred to as the ‘Destination’ environment), or even on a separate static environment that is not part of the migration process at all. As long as the Search Head which Atlas Splunk Migration Helper is installed on is connected as a distributed peer to both the Source and Destination environments, Atlas will be able to gain useful insights to help track the status of your migration.
Requirements
Three initial configuration steps must be completed before using the Splunk Migration Helper app.
The customer should already have access to their destination Splunk or Splunk Cloud environment and set up any applicable Search Heads as distributed search peers on the Search Head where Atlas will be monitoring the migration. This will allow REST communication between your two environments.
The Atlas Search Head will need access to the destination indexers using federated search or distributed search. Federated Search is highly recommended for all splunk environments 9.0 or later. Refer to section Configure the Atlas Search Head and REST Connections for more details.
The customer must update four macros, which define the Splunk servers that will be part of the migration from the source Splunk environment to the destination environment. The process for updating macros has been made easy with a user interface within Splunk Migration Helper and will be described in the following section.
Metric indexes for Atlas Data Utilization should be set, and Atlas Forwarder Awareness needs to be actively recording forwarders.
Setting up Macros for Atlas Splunk Migration Helper
Atlas Splunk Migration Helper has four macros that are used throughout the application to compare your source and destination servers throughout your migration. These macros must be configured before using Splunk Migration Helper.
atlas_migration_dest_idxrs
atlas_migration_dest_shs
atlas_migration_source_idxrs
atlas_migration_source_shs
To configure these Macros, click the “Define Splunk Environments” button at the top of Splunk Migration Helper.

Scrolling through the modal allows you to update each of the four macros through an interactive form. If you have already peered your source and destination environments, these severs will appear as options in this form. You can filter the list of available indexers and search heads and click to add them to the “selected” column. Clicking the “Show Macro” link text will expand a preview of the actual string that will be stored as the macro value.

Phase 1: Migration Overview
Atlas Splunk Migration Helper provides users a guided process for organizing their environment, determining which assets are critical for migration, then tracking to see if those assets have been successfully migrated to their new environment. The migration process is broken into 4 phases: Migration Assessment, Prepare for Migration, Migration, and finally Validate, Triage and Optimizing your new environment. All of these phases and their corresponding steps are outlined in the Migration Helper Dashboard, providing a high-level view of your migration process.
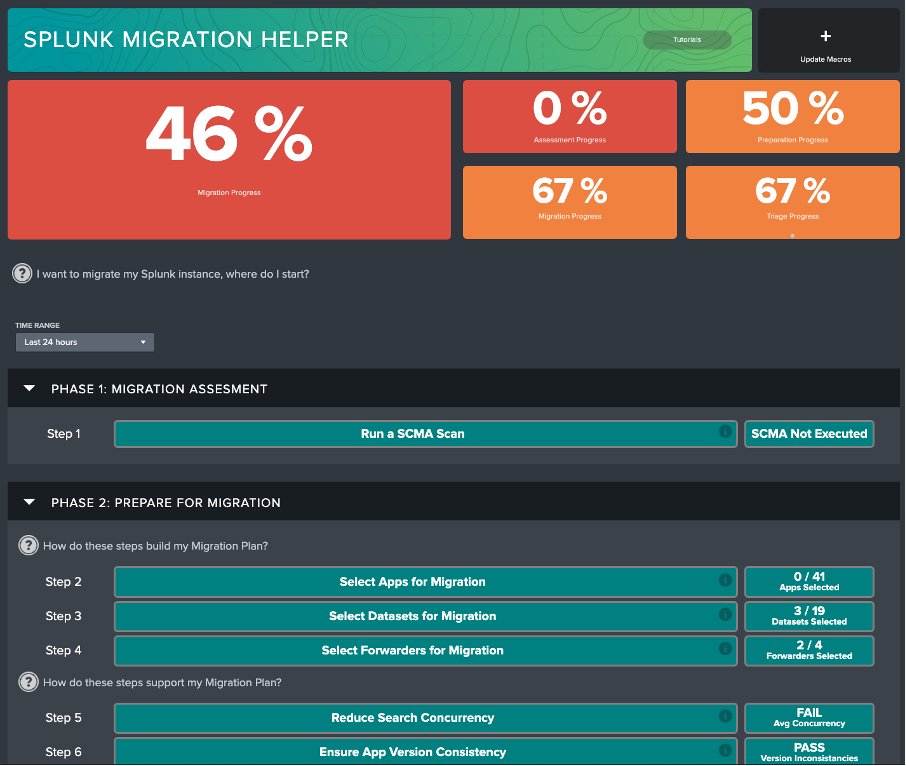
Migration Helper Dashboard
The Migration Helper Dashboard provides an overview of the migration process. Health checks are provided for each step, which are then rolled up into overall progress scores at the top of the page.
Integrating with Splunk Cloud Migration Assessment (SCMA)
The first step in the Splunk Migration process is running Splunk’s own Cloud Migration Assessment. The SCMA app is available on Splunkbase and provides useful checks to determine your environment’s readiness for migration. After running the SCMA, you will see that the Phase 1 section of Migration Helper reflects this.
Phase 2: Building a Migration Plan
Phase 2 involves steps in building out a migration plan. The steps are aligned to help users focus on key assets, and their required dependencies. The flow begins with identifying which Apps are critical for migration, then exploring the data that is used to power those apps, and finally, identifying which key infrastructure hosts are responsible for sending that data into Splunk. Additionally, Phase 2 provides steps to optimize your source environment before migration by cleaning your saved searches, ensuring version consistency across your apps, identifying knowledge objects within your environment, assigning ownership and useful metadata to datasets, and providing insight on optimizing your forwarders to their new environment.
Once all of these sets are complete, the user should have a clear understanding of what they need to migrate, and feel confident that the assets they are migrating are in pristine condition. To get started, select the Step 2: Select Apps for Migration button from the Migration Helper home page, or navigate to the “Prepare for Migration” section on the nav bar and select the “Select Apps” link.
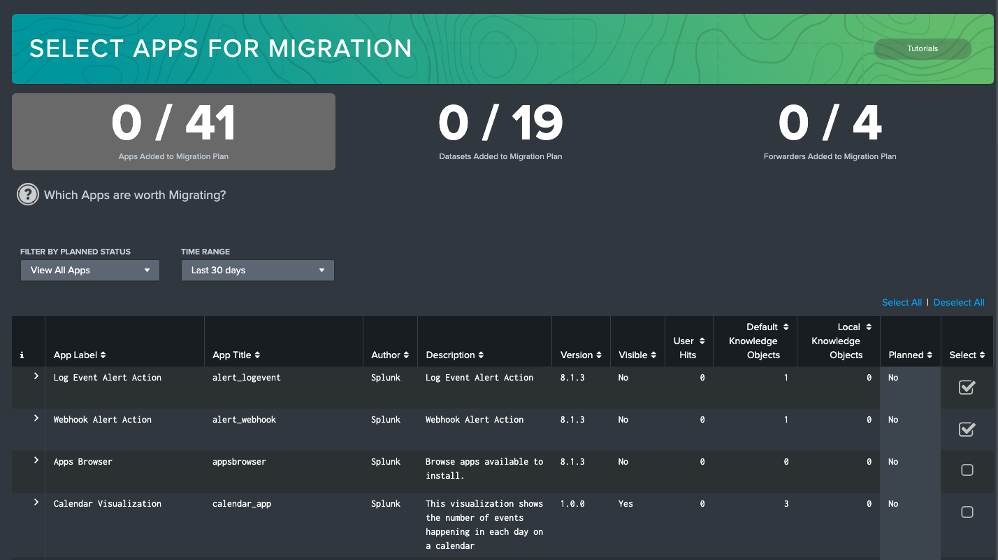
Select Apps
On the Select Apps dashboard, you can view the Apps installed on your source Splunk environment’s Search Head and view their details. The goal is to add the apps that you would like to migrate to the destination environment to your migration plan. Selecting one or more apps in the right-most column allows you to add or remove the app from the plan with the action buttons at the bottom of the table. To continue to the next step, “Select Datasets”, use either the nav bar or the “Select Datasets” link at the bottom right.
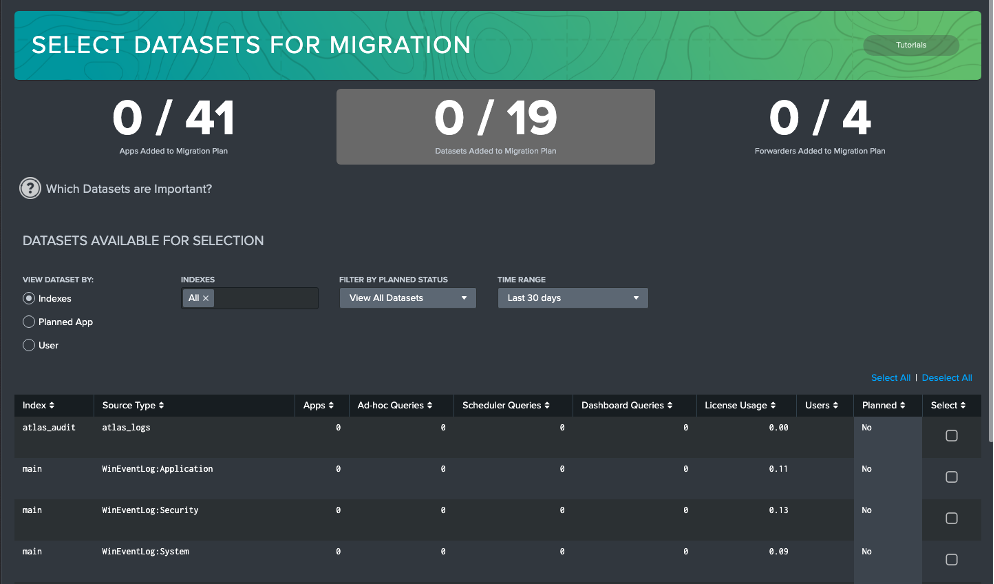
Select Datasets
The Select Datasets dashboard has a similar goal to the Select Apps dashboard. You are selecting the datasets you would like to move to your new environment. By default, this view displays all datasets in your source environment, which can be filtered by index. You can change the view to ‘Planned App’ to sort these datasets or filter them to include only those from planned apps. In a third view, you can sort datasets by ‘User’ to display which datasets are most used by specific users on your system. Considering all these different views should help you appropriately assess which datasets are critical when migrating to a new environment.
Select one or more datasets and add them to the plan using the action buttons at the bottom of the table. Again, there is a handy link to the next step, “Select Forwarders”, at the bottom of the page.
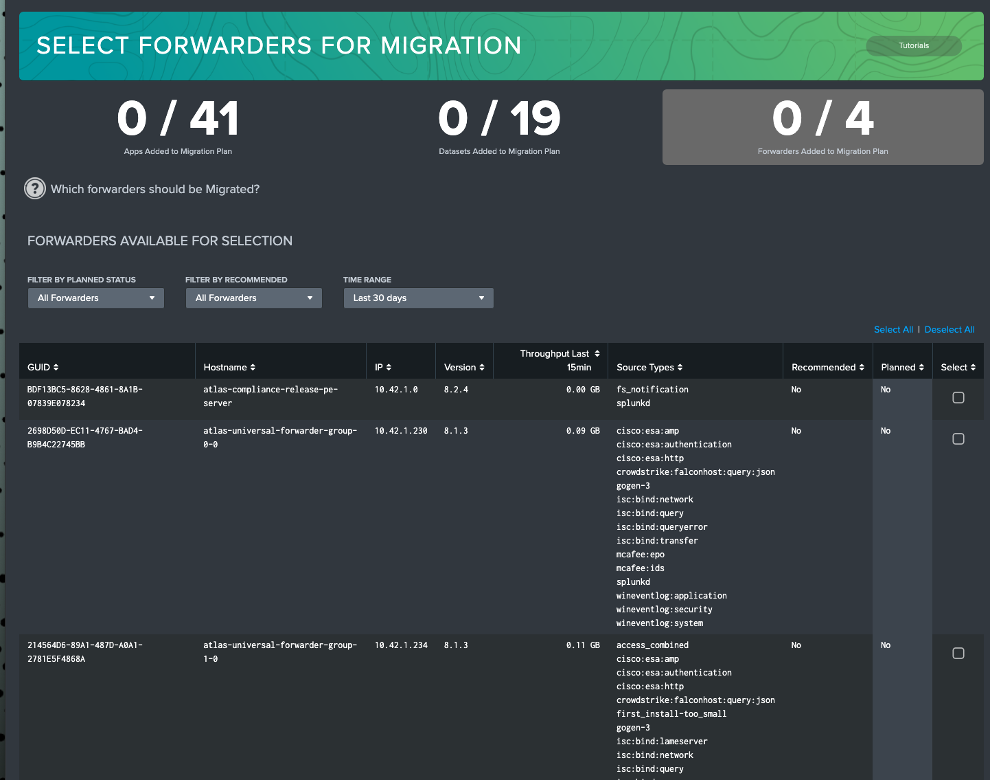
Select Forwarders
Like the last two dashboards, Select Forwarders is your tool for planning which forwarders you would like to migrate. Select one or more forwarders and add or remove them from the plan with the action buttons at the bottom. The next step, “Identify Local Knowledge Objects” can be reached from the link at the bottom.
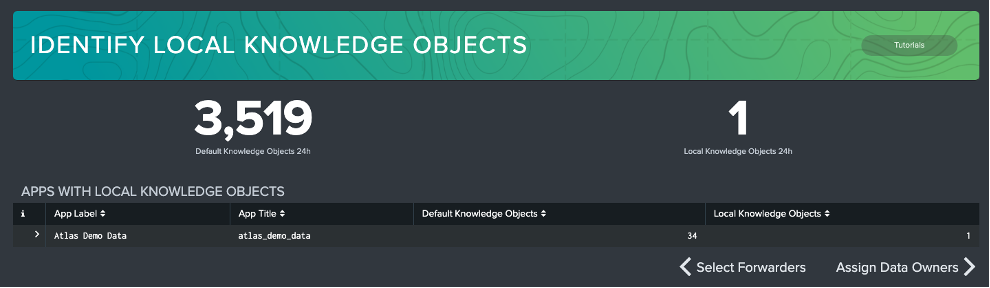
Identify Local Knowledge Objects
This dashboard helps you identify any local changes users have made to your apps planned for migration. These local changes may or may not be wanted when you move the app to the destination environment. For example, you may want to discard unwanted changes or merge changes to default if they are legitimate improvements. The next step, “Assign Data Owners” can be reached from the link at the dashboard.
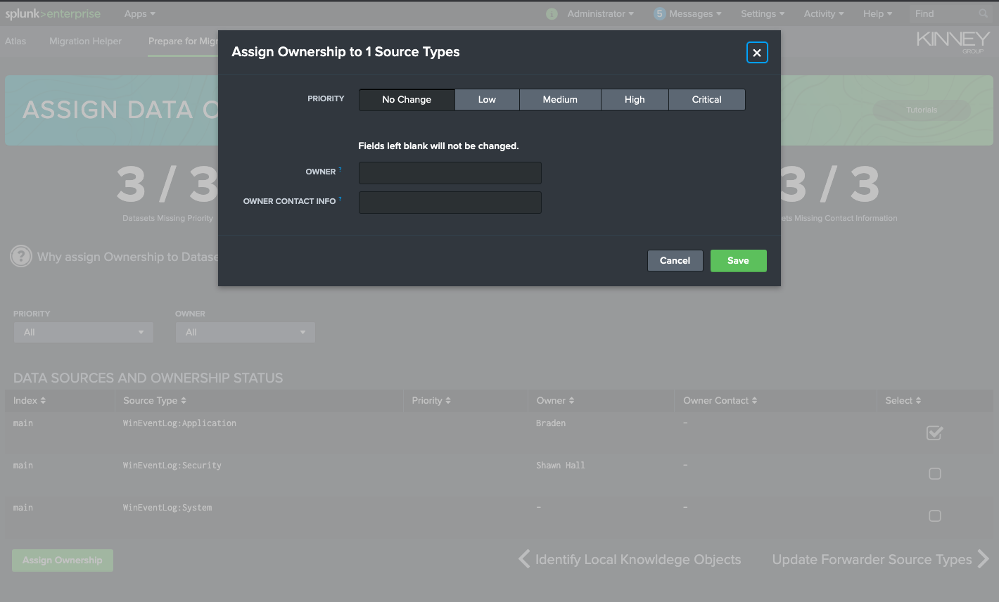
Assign Data Owners
Assign Data Owners is all about accountability and awareness for datasets coming into Splunk. Atlas has various features related to data ownership and that same methodology is present on this dashboard. Assign owners to your planned datasets so you know who to contact if needed during the migration and who is responsible for that portion of your daily ingest. This ownership is also visible in Atlas Data Management. Click “Update Forwarder Source Types” at the bottom right to move on to the next step.
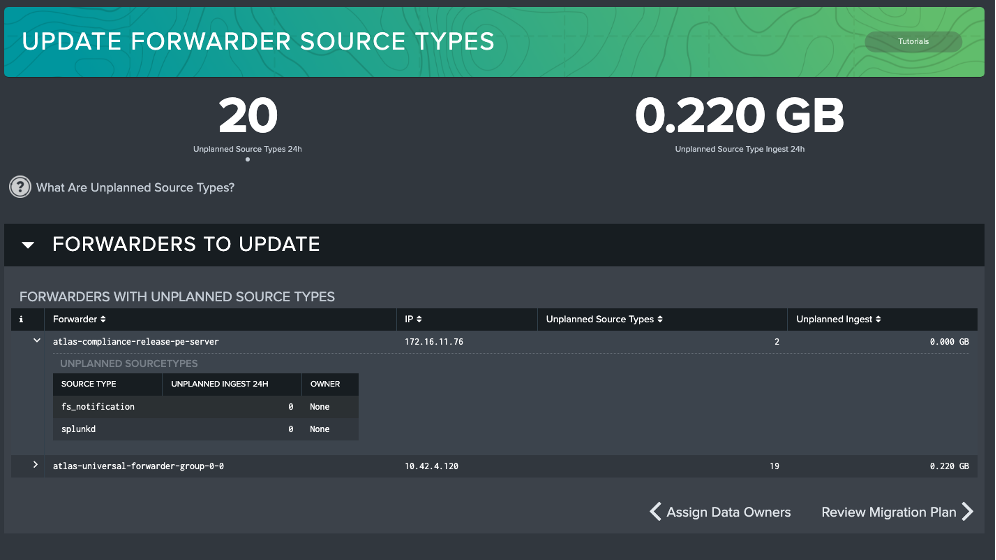
Update Forwarder Source Types
Not all datasets coming from selected forwarders are necessarily planned for migration. The Update Source Types dashboard identifies which forwarders have these unplanned source types. Update these forwarders to only forward wanted data and they will drop off the list.
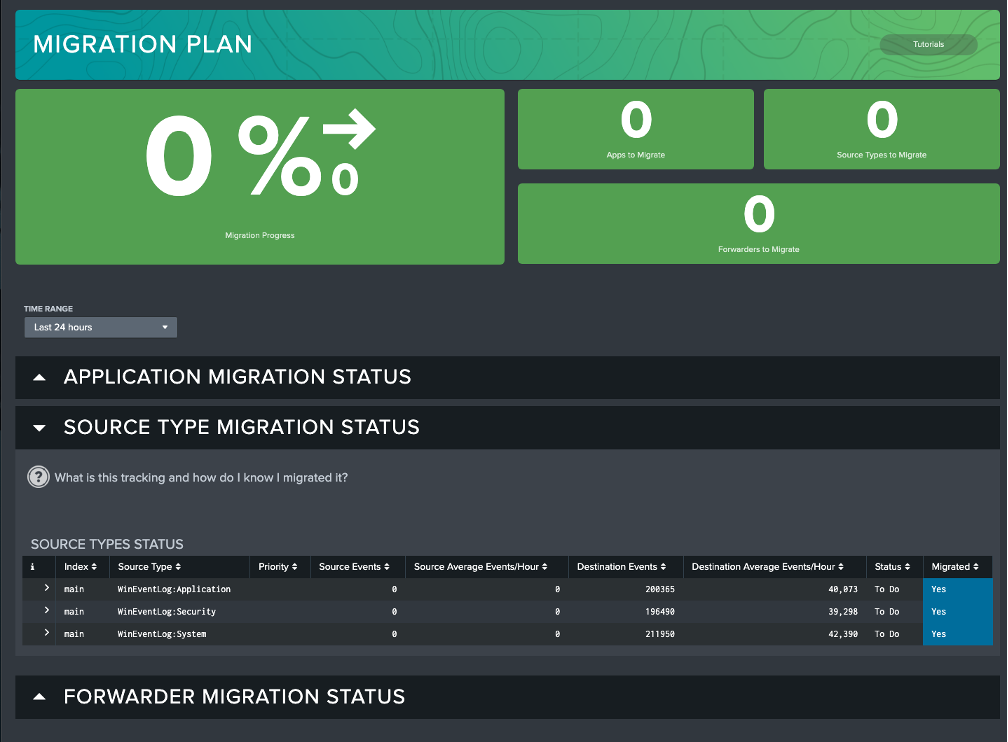
Phase 3: Tracking Your Migration
Once you have determined which assets need to be migrated, and added them to your migration plan, use the Migration Plan dashboard to track progress of your migration. The Migration Plan dashboard tracks the status of the items you’ve added to your plan. It does this by comparing logs and configuration states on your source and destination servers. There are three main sections of this plan that track presence of Apps, compare Dataset events to ensure data is coming in as expected, and finally track the migration status of Forwards to ensure that all your critical infrastructure is in alignment on your destination environment.
Phase 4: Validating Your New Splunk Environment
The purpose of Phase 4 is to validate that your new environment is healthy and track down any issues that may have arisen during migration. Here users are directed to key Atlas Apps that are purposed built for tracking your key migration assets – Forwarder Awareness to check on health of forwarders, Data Management to provide insight to your datasets, and finally App Awareness to track utilization and version consistency within your new environment. These Atlas apps will ensure that users maintain a healthy environment post migration.