Using Forwarder Awareness
Atlas Forwarder Awareness offers a powerful way to monitor Splunk forwarders, empowering Splunk administrators or system owners with tools to effectively track forwarder connections and gain insights into their health and licensing impact. Quickly identify offline forwarders and affected data feeds, enhancing visibility to ensure optimal performance and license utilization.
Accessing Forwarder Awareness
To begin, you can access Forwarder Awareness by clicking on the Forwarder Awareness tile on the Atlas home page. By default, it can be found in the Atlas Foundations for Splunk section on Atlas Core.
Configuring Forwarder Awareness
To use Forwarder Awareness, it is recommended to first perform some configuration steps in your Splunk environment. Forwarder Awareness leverages a metric index for reporting license utilization by Splunk forwarders and data sets. You will need to assign a metric index for tracking license usage data. You can use existing metric indexes that you already have created, but it is recommended that you assign dedicated index. This metric index is the same index utilized by Data Utilization. This enables both elements to function while preventing duplicate resources, however, changing the index selected will change the selection in both elements, impacting both Forwarder Awareness and Data Utilization.
If Data Utilization is already fully configured, then Forwarder Awareness will be automatically configured as well.
The Configuration page in Forwarder Awareness is used to help you see if you have met all of the requirements for the Element to function properly. Navigate to the Configuration page where you will find two sections. The Requirements section has automated checks that will indicate if Forwarder Awareness is configured correctly. The Settings section has controls that help you configure the Element.
To configure Forwarder Awareness, follow these steps:
- Following your local Splunk policies and procedures, create a metric index for license usage data. Be sure that both the Forwarder Awareness and Data Utilization Element has access to that index.
- Navigate to the Configuration page of the Forwarder Awareness Element and scroll down to the Settings section.
- Assign the index that you created for license usage to the License Usage Metrics Index by selecting it from the dropdown.
- Click the Save Changes button to complete the configuration.
Requirements
Use the Configuration page of Forwarder Awareness to see if your Splunk environment meets the requirements for proper operation.
- The metric index need to be selected for the Element to use during operation.
- The user must have read permissions to the selected metric indexes and the required Splunk APIs so that the Element will function properly.
If these requirements are not met, the Element will display a red ball icon on the Configuration page next to the check that needs attention. Guidance will be provided on the screen to assist with meeting the requirement.
Default Groups
Certain Forwarder Groups can be instantly created leveraging the Default Forwarder Groups setting. On the Configuration dashboard, under the Setting's header, a Splunk Admin can select to activate default groups for Operating Systems, Forwarder Types, and Missing Forwarders. Checking these selections and saving will do the following:
Operating Systems: Create two forwarder groups aligned to Linux and Windows operating systems, assigned with the respective forwarders.
Forwarder Types: Create two forwarder groups aligned to Heavy or Universal Splunk Forwarders, filled with respective forwarders.
Missing Forwarders: Create a single group that will self populate with any currently missing forwarders.
These default groups will automatically update with new forwarders added to the system, or with forwarders changing their configuration.
Forwarder Group Overview
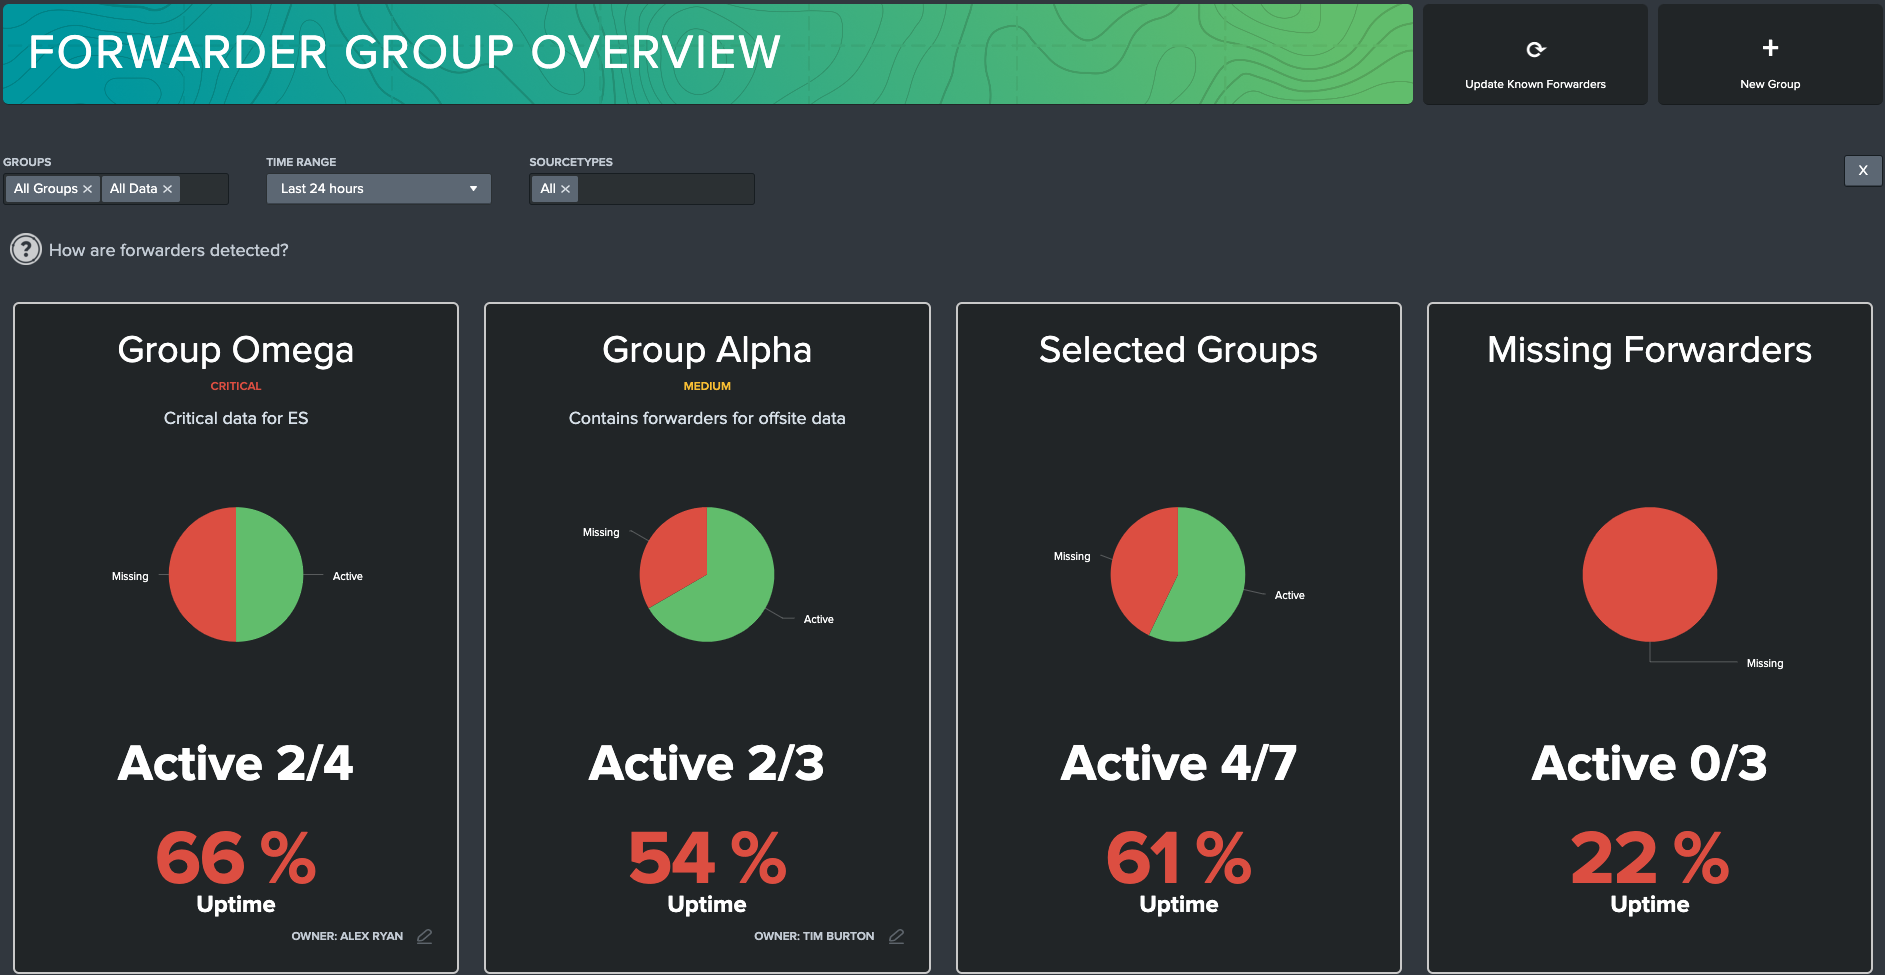
The Forwarder Awareness Element in Atlas provides an entry dashboard called Forwarder Group Overview. This dashboard allows users to create and monitor Forwarder Groups. Forwarder Groups are a feature within Atlas which logically groups forwarders together using criteria chosen by the user. As an example, this criteria can be based on forwarder deployment geography, organizational ownership, or criticality of the data being sent by the forwarder.
Each group displays summaries of each user created forwarder group, missing forwarders, and an All Forwarders group. Selecting a specific forwarder group takes the user to the Forwarder Awareness Report.

Forwarder Group Tiles
Forwarder group tiles display summary information about the status of forwarders. These are designed to be quick views of forwarder status.
Active vs. Missing Forwarders is represented by the pie chart along with the Active KPI which both represent the current status of all forwarders in the group.
Uptime refers to the period of time that a forwarder has been continuously operational and available in Splunk without interruption or downtime. The aggregate uptime is displayed on the tile for all of the forwarders in the group.
Creating a Forwarder Group
Forwarder Groups are the primary building blocks for Atlas Forwarder Awareness. Creating a Forwarder Group is easy, and should be the first step you complete to enable Forwarder Awareness to track your Forwarder infrastructure and reduce data flow interruptions. After creating a Forwarder Group, a group owner can be alerted when missing forwarders occur in an environment. This is accomplished by configuring the alerts that come with Forwarder Awareness.
On the Forwarder Groups Overview page, click the New Group button in the top right.

A modal should appear. The modal will contain the following required fields to fill out:
Group Name: Give the forwarder group a meaningful title. Some common use cases are business unit objectives, or physical characteristics.
Priority: Select the criticality of the forwarder group so that users understand the impact of a forwarder outage.
Hosts: Search and select forwarders to add (or remove) to the forwarder group from the list provided.
tipServer Classes can be added to forwarder groups as well in Forwarder Awareness. This will enable forwarder groups to mirror server classes created on the deployment server automatically. To enable this feature, the deployment server must be a search peer to the search head where Atlas is running.
Description: Input a quick description of the Forwarders that will be monitored.
Contact: This is the 'Owner' of the data, and is the person that should be contacted in case of an outage.
Contact Info: This requires an email, and should be related to the Contact listed in the prior field. This email will be notified in the case of an outage.
Select Save to create your forwarder group. A new forwarder group tile should now appear on the Forwarder Groups dashboard.
Editing a Forwarder Group
Any custom forwarder group can be edited after it has been created. Missing Forwarders and All Forwarders are default groups that cannot be modified.
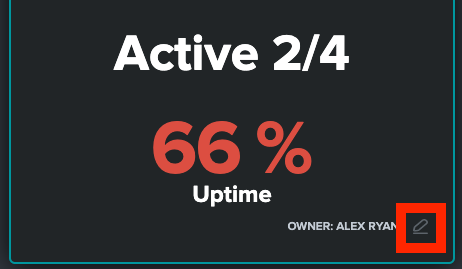
Select the Edit symbol in the bottom right of a forwarder group tile.

A modal appears with all of the forwarder group options.
Change the desired options and Click the Save button.
Deleting a Forwarder Group
Any custom forwarder group can be deleted after it has been created. Missing Forwarders and All Forwarders are default groups that cannot be deleted.
Select the Edit symbol in the bottom right of a forwarder group tile.

A modal appears with all of the forwarder group options.
Click the Delete Group button
Confirm delete by clicking *Delete on the confirmation modal that appears.
Forwarder Inventory
The Forwarder Inventory interface is where you will find detailed information about the status of the forwarders in your environment. You can get to this interface by clicking on a forwarder group tile or by selecting the Forwarder Inventory navigation link at the top of the page. If you navigate from a forwarder group tile, the forwarder inventory list will automatically be filtered by forwarder group. Clicking on the All Forwarders tile will display all forwarders in your inventory.

Using Filters and Controls
The Forwarder Inventory interface displays metrics and information about the Splunk forwarders in your environment. Here's how you can utilize the filters to customize your view:
Forwarder Group: Use this dropdown to filter the forwarders displayed based on specific groups you've configured. (This field is not visible if there are no forwarder groups configured)
Forwarder Status: Filter forwarders by their current status, such as active, inactive, or all.
Forwarder Type: Select the type of forwarder you want to view, such as Universal Forwarder or Heavy Forwarder.
Time Range: Choose the time range for which you want to see forwarder data, such as the last 24 hours or a custom range.
SourceTypes: Select the source types you want to include or exclude from the display.
Search: You can also use the search bar to quickly find specific records by searching on any text that is displayed in the table.
The interface provides visual controls that can also be used to filter the Forwarder Inventory table below. These controls are interactive and can be used as a way to further filter down the list of forwarders.
Operating System (Pie Chart): Shows the distribution of operating systems of the machine hosting the forwarder. Clicking on the pie will filter the table below.
Forwarder Type: (Pie Chart): The type of forwarder that is reporting in (universal, heavy). Clicking on the pie will filter the table below.
Forwarder Version: (Pie Chart): Shows the distribution of forwarder versions. Clicking on the pie will filter the table below.
SSL Enabled: (Single Value): Shows the forwarders that have SSL enabled for secure data transmission.
Alerts Muted: (Single Value): Shows the number of Forwarder Awareness alerts that have been muted.
-Missing Forwarders: (Single Value): Displays the forwarders that are reported as missing out of the total number of forwarders available.
Missing forwarders are calculated by monitoring their connection status over the previous two weeks. If a forwarder has not checked in within the last 15 minutes, it is considered missing.
Using the Forwarder Inventory Table
The Forwarder Inventory table displays a list of all forwarders matching the filter criteria set in the dropdowns above. Each row represents a single forwarder instance. You can sort the table by clicking on any column header.
The columns provide detailed information about each forwarder:
Hostname: The hostname of the machine running the forwarder.
Forwarder Type: The type of forwarder that is reporting in (universal, heavy).
IP: The IP address of the forwarder.
SSL Enabled: Indicates whether SSL is enabled for secure data transmission.
Splunk Version: The version of Splunk running on the forwarder.
OS: The operating system of the machine hosting the forwarder.
Architecture: The CPU architecture of the host machine (e.g., x64, x86_64).
GUID: The globally unique identifier for the forwarder.
Receiver Count: The number of receivers the forwarder is connected to. (A receiver is a Splunk Enterprise instance that receives data from a forwarder. The receiver can be an indexer or a forwarder.)
Connection Count: The number of active connections the forwarder has had in the selected time range.
License Utilization: The percentage of the Splunk license being utilized by the forwarder.
Average Events: The average number of events per second being forwarded.
Last Connected: The timestamp of when the forwarder last connected.
Uptime: The percentage of time the forwarder has been up and running and not reporting as missing.
Status: The current status of the forwarder (e.g., active, inactive).
Alert: Use this control to mute alerting for the forwarder.
Each row in the Forwarder Inventory table can be expanded to expose detailed telemetry about the activity of the forwarder in the specified time range.
Check Ins Over Time: Displays the detailed check-in activity from the forwarder in the selected time range.
Average Ingest Over Time: Displays the average ingest over the selected time range for the forwarder.
License Usage Over Time by Source Type: Displays license usage over time by source type.
Data Sets: The list of data sets that the forwarder provides data for by index and source type. This is useful if you want to understand what data is impacted when the forwarder is offline.
Forwarder Upgrade Helper
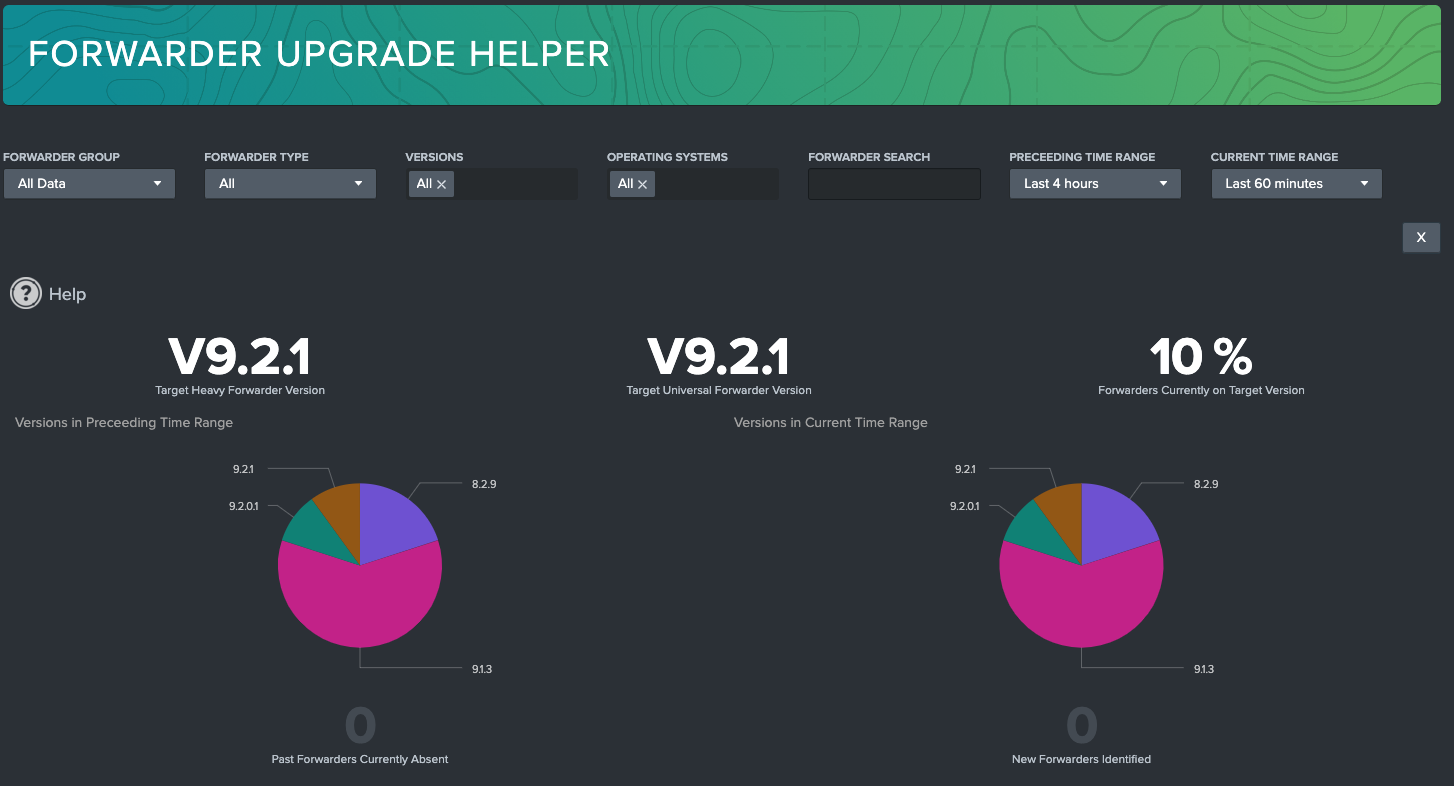
Clicking on Forwarder Upgrade Helper on the navigation bar will open a new tab. This dashboard is built to enable admins to view forwarders by version, and track change over time.
This dashboard provides a percentage coverage on how many versions of Heavy Forwarders and Universal Forwarders align to the target version. This target version can be changed through the 'atlas_heavy_forwarder_target_version' and 'atlas_universal_forwarder_target_version' macro. Forwarders meeting these version will count towards the percent score.
The version tracking on the dashboard is powered by two time ranges: Preceding Time Range & Current Time Range. Leverage those Time Ranges to identify a before and after time period to compare Forwarder versions in the pie charts.

Below the pie charts, there is a report on number of new or missing forwarders. 'Forwarders Absent' tracks forwarders found in the Preceding Time Range but not the Current Time Range, and the opposite for 'New Forwarders'. These KPIs are selectable and export the forwarders that meet the definition.
The next visualization contains a table with recommended upgrade steps based on identified versions. These upgrade recommendations are based on documentation at time of Atlas release. Expanding the row will reveal the forwarders that should be upgraded along that path. Below this table is an exportable table that contains the summary list of all recommended upgrades.

Forwarder Awareness Searches for Reporting and Alerting
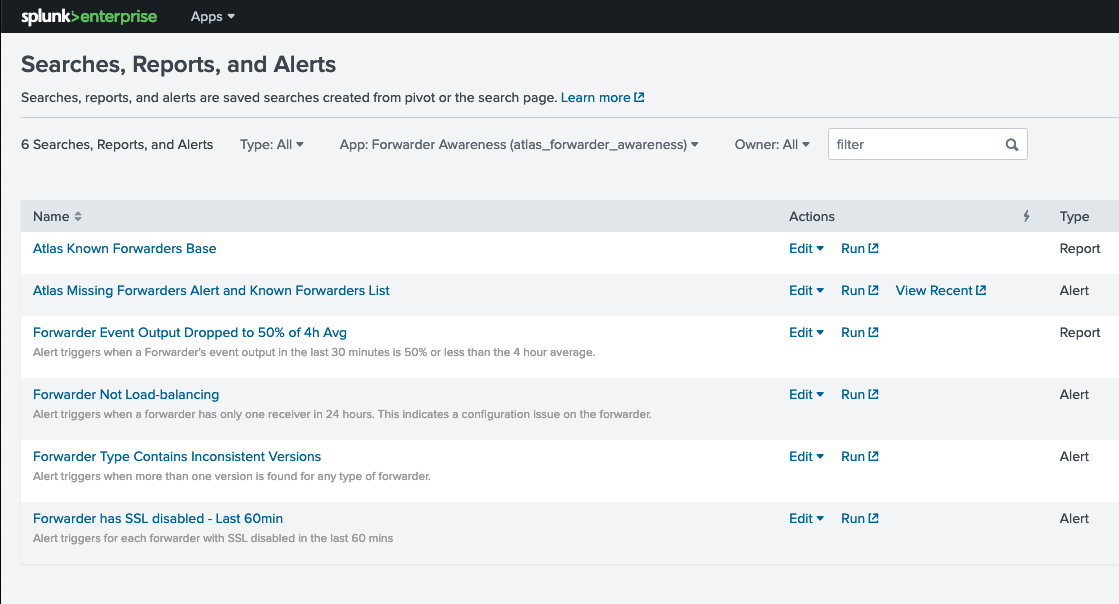
Clicking on Forwarder Awareness Searches on the navigation bar will open a new tab. This tab contains searches, reports, and alerts that come with Forwarder Awareness. These can be enabled in your environment so that Splunk administrators and forwarder group owners are alerted when something in their forwarder environment changes.

The following list of searches are installed by default with Forwarder Awareness:
Atlas Known Forwarders Base
This search should be enabled by default when Forwarder Awareness is installed and is the primary search used to monitor the forwarder groups in the environment. This search is required to ensure the basic capabilities of Atlas Forwarder Awareness are functional.
dangerThis search should NOT be modified. Changing this search could negatively impact the behavior of Atlas Forwarder Awareness.
Atlas Missing Forwarders Alert and Known Forwarders List
This search is used to create alerts in Splunk for when a forwarder is determined to be missing. This alert can be enabled and configured to send any type of alert in Splunk to report on missing forwarders determined by Atlas.
Forwarder Event Output Dropped to 50% of 4h Avg
This search is designed to monitor the efficiency of data forwarding, generating a report that shows when a forwarder's output over the last 30 minutes falls to 50% or below of its 4-hour average, ensuring timely identification and resolution of potential data processing bottlenecks.
Forwarder Not Load-balancing
This search is designed to detect potential configuration issues with forwarders by triggering an alert if a forwarder is found to be sending data to only one receiver over a 24-hour period. This condition often points to a lack of proper load balancing, which could lead to inefficiencies and bottlenecks in data handling and processing within the system.
Forwarder Type Contains Inconsistent Versions
This search is specifically used to identify discrepancies in the versioning of forwarders, by generating an alert when multiple versions are detected for the same type of forwarder. This alert serves as a critical check to maintain consistency and optimal operation of the forwarder infrastructure, highlighting potential issues that may require version standardization or updates.
Forwarder has SSL disabled - Last 60min
This search is set up to enhance security monitoring by triggering an alert for each forwarder that has SSL (Secure Sockets Layer) disabled. This alert is crucial for identifying and addressing potential security risks, ensuring that data transmission remains encrypted and secure across the network. By default this search is set to scan for any disabled forwarders in the last 60 minutes.