Version: Atlas v3.11

Atlas Standard Deployment Instructions

Installation Overview

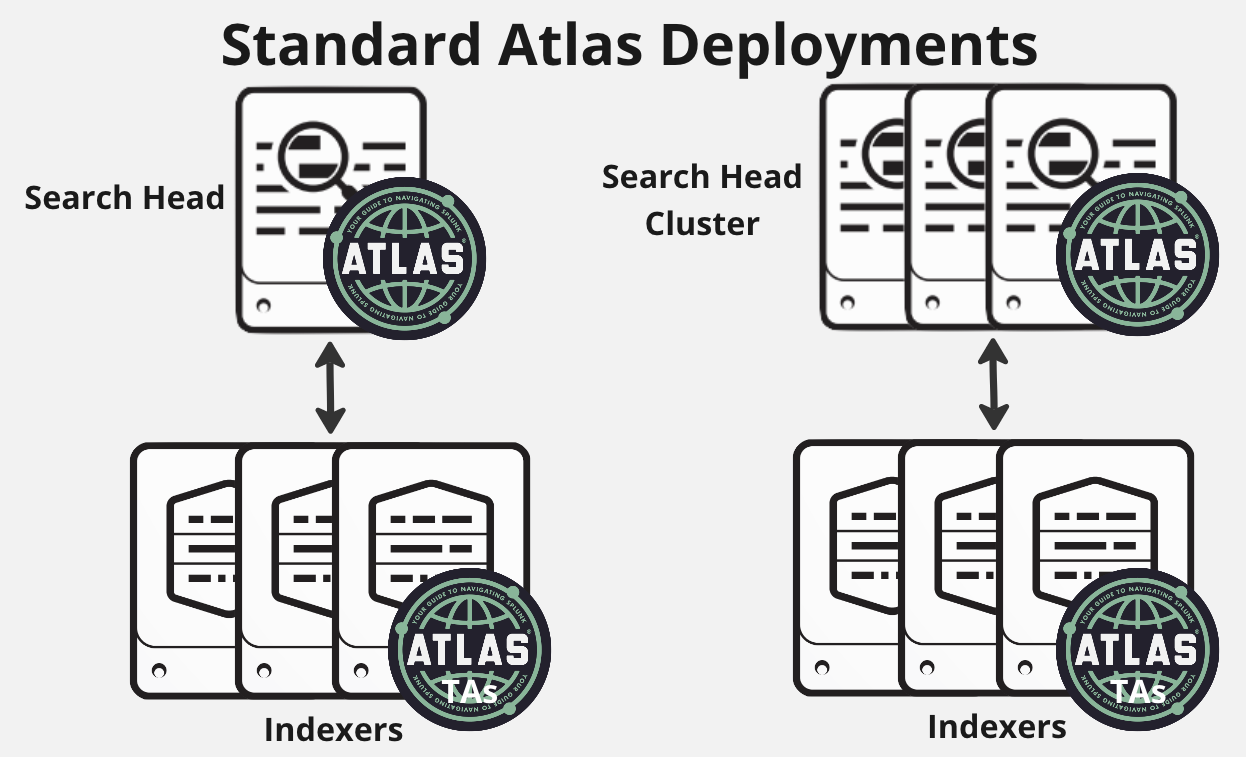
Atlas will be installed on a Search Head deployed in your local on-premises environment. This Search Head will be referred to as the “Atlas Search Head” throughout this document.

If your Splunk deployment includes a Splunk Cloud environment, the Atlas installation process requires additional steps. Please refer to the installation instructions in Platform Installation (Splunk Cloud) instead of this document.

Deployment

The Atlas Search Head Deployment Guidelines

Atlas Installation

This guide will outline the steps required to install the Atlas Platform on your on-premises Atlas Search Head. Getting Atlas up and running will take under two hours. The Atlas Platform comes paired with Expertise on Demand (EoD), and you are encouraged to reach out to EoD for Atlas installation support should you need help.

Atlas Distributed Install Matrix

Use the tables below to determine where and how to install the Atlas Platform. Depending on your environment, your preferences, and the requirements of the add-on, you may need to install Atlas Elements and Technical Add-Ons (TAs) in multiple places.

Atlas ElementSearch HeadsIndexersHeavy ForwardersUniversal ForwardersComments
Atlas CoreYesNoNoNo-
Atlas AssessmentYesNoNoNo-
App AwarenessYesNoNoNo-
Data ManagementYesNoNoNo-
Data UtilizationYesNoNoNo-
ES HelperYesNoNoNoOther deployment options may be considered, see ES Helper documentation for more information
Forwarder AwarenessYesNoNoNo-
MonitorYesNoNoNo-
Monitor TAYesYesNoNoInstall on Index & Search Head Layer to create required Indexes
Performance & Capacity An.YesNoNoNo-
Scheduling AssistantYesNoNoNo-
Scheduling InspectorYesNoNoNo-
Splunk Migration AssistantYesNoNoNo-
STIG ComplianceYesNoNoNo-
STIG Compliance STIG TAYesYesYesYesInstall on Index & Search Head Layer to create required Indexes & Data Transformations
STIG Compliance SCAP TAYesYesYesYesInstall on Index & Search Head Layer to create required Indexes & Data Transformations
  • If your deployment will include the Atlas Element Atlas Monitor, please visit the Atlas Monitor page for installation instructions and requirements

  • If your deployment will include the Atlas Element STIG Compliance, please visit the Atlas STIG Compliance page for installation instructions and requirements

Installing the Atlas Platform on the Search Head

Locate the Atlas Installer .tgz file (SA_atlas_installer-<version>.tgz) received when Downloading Atlas. Follow the guidance below for installing the application via the Splunk Web UI or CLI. The Atlas Platform Elements can then be automatically installed by running the installer script.

Splunk Web Upload

  1. Sign in as a Splunk Admin on your Atlas Search Head and navigate to Apps -> Manage Apps in the Splunk Web UI.

  2. Click on the Install App from File button located in the top right.

    Step 3

  3. Select the SA_atlas_installer-<version>.tgz file and Click "Upload". If you experience an issue, try selecting the “Upgrade App” checkbox when repeating the upload process. This option is required when upgrading to a new version of the Atlas Installer.

    Step 4

    note

    You can confirm a successful upload of the file by searching “Atlas” on the Manage Apps screen, listing the Atlas Installer in Splunk's applications.

Splunk CLI Installation

  1. Using any available method, copy the application to an accessible directory on the Splunk Server where Atlas will be installed. The example below uses the scp utility.

    scp SA_atlas_installer-<version>.tgz splunk@atlas-search-head.example.com:/tmp
  2. Using any available method, access the CLI on the Splunk Server where the Atlas Installer has been copied. If applicable, become the Splunk service user.

    ssh splunk@atlas-search-head.example.com
  3. Run the Splunk CLI application installation command on the provided SA_atlas_installer-<version>.tgz. Adjust relative paths accordingly, or use absolute paths as documented. Address prompts for Splunk authentication as needed by providing valid credentials of a user configured with the admin role for the Splunk instance.

    # Where $SPLUNK_HOME is Splunk's home directory, e.g. /opt/splunk
    $SPLUNK_HOME/bin/splunk install app /tmp/SA_atlas_installer-<version>.tgz

Running the Atlas Installer Script

The Atlas Installer script must be run from the CLI. If the SA_atlas_installer application was installed via the CLI, skip to step 2.

  1. Using any available method, access the CLI on the Splunk Server where the Atlas Installer has been copied. If applicable, become the Splunk service user.

    ssh splunk@atlas-search-head.example.com
  2. The installer can be run without any arguments to guide an administrator through a series of prompts. The installation process can be customized by providing options detailed under Atlas Installer CLI Options. Basic usage of the installer script is shown below:

    # Where $SPLUNK_HOME is Splunk's home directory, e.g. /opt/splunk
    $SPLUNK_HOME/bin/splunk cmd python $SPLUNK_HOME/etc/apps/SA_atlas_installer/bin/atlas_installer.py
Atlas Installer Default Prompts

Running the installer script without any options will provide a series of prompts to modify the type of installation and confirm the resulting installation directories.

  1. In the first prompt, select the Deployment Type.

    Select Deployment Type:

    1 - Standalone Search Head
    2 - Deployer (SHC)
    3 - All in One

    Enter selection (1-3): 1
    • Standalone Search Head: This option installs the Atlas Elements to the $SPLUNK_HOME/etc/apps directory for use on the local Search Head. Any Elements requiring installation on additional Splunk Server types can be copied to the appropriate locations for manual installation (e.g. Cluster Manager for TA deployment to Indexers)

    • Deployer: This option installs the Atlas Elements to the $SPLUNK_HOME/etc/shcluster/apps directory, allowing admins follow standard deployment procedures to Search Head Clusters

    • All in One: This options installs the Atlas Elements to the same location as the Standalone Search Head option, $SPLUNK_HOME/etc/apps, while also copying any appropriate Elements to the $SPLUNK_HOME/etc/deployment-apps directory. This allows for the use of the All in One Atlas Server to push relevant Atlas configurations to Universal Forwarders with minimal configuration of the Deployment Server functionality.

      note

      If no Elements in the acquired installation package are intended to be deployed by Deployment Server, the installation procedure for this option only deploys to the $SPLUNK_HOME/etc/apps directory.

  2. In the second prompt, confirm the installation paths based on the previous selection.

    Destination path(s):

    /opt/splunk/etc/apps

    Proceed with installation? [y/n]: y
  3. Restart the Splunk service after the script completes.

    $SPLUNK_HOME/bin/splunk restart
Atlas Installer CLI Options

Run the installer script with the --help option to see additional details on setting deployment types without interactive prompts.

$SPLUNK_HOME/bin/splunk cmd python $SPLUNK_HOME/etc/apps/SA_atlas_installer/bin/atlas_installer.py
usage: Atlas Platform Installer [-h] [--install-type {local,deployer,aio}]
[--exclude {es,smh}]

This Supporting Add-on installs the Atlas Platform for Splunk.

optional arguments:
-h, --help show this help message and exit
--install-type {local,deployer,aio}
Target Splunk server type for installation.
--exclude {es,smh} Exclude special-use element sets.

Visit the Atlas Documentation site for more details:
https://https://docs.atlas.kinneygroup.com/

Post Install Configuration

Configure Atlas Audit

Auditing is important for tracking utilization of Atlas’s many useful tools and automation that can speed up Splunk actions. The Auditing feature helps Admins easily track their and their users’ actions on the Atlas platform. This auditing does not share information with third parties and does not ‘reach out’ over the network. It remains entirely internal to the Splunk deployment, much like Atlas itself. Atlas logging should not generate more than 5 MB of index data a day.

  1. Configure the Atlas Audit Index

    • By default, Atlas Audit will store audit events in a Splunk index named atlas_audit, which is specified in the atlas.conf file located at $SPLUNK_HOME/etc/apps/atlas_core/default/. An example of the contents of the /default/atlas.conf file is:
    [license]
    license_key =

    [atlaslogs]
    index = atlas_audit
    sourcetype = atlas_logs
    • If you wish to use a different index name or already existing index, create or edit an atlas.conf file in the $SPLUNK_HOME/etc/apps/atlas_core/local folder, add an [atlaslogs] stanza and an index = entry with the preferred index name. An example of an atlas.conf file in the /local folder which has been edited to specify a different audit logs index is as follows:
    [license]
    app = atlas_core
    disabled = 0
    license_key = (your Atlas license key)

    owner = nobody

    [atlaslogs]
    index = preferred_atlas_audit_index_name
    • Do not change or make any entry that would alter the sourcetype - the source type must remain atlas_logs for proper operation.
    • Do not edit the atlas.conf file in the /atlas_core/default/ folder - any changes made there will be overwritten during an upgrade.
  2. Create Atlas Audit Index (*required)

    • Using your preferred process, create the atlas_audit index (or preferred index name, if different) on both your indexing and search tiers.
  3. Restart or Refresh the Atlas Search Head to start capturing audit events.

To test the audit logging feature, view the Data Utilization dashboard and click on an index : sourcetype entry in the UTILIZATION BY DATASET panel. Then navigate to the Atlas Audit dashboard (top menu: Atlas > Audit) - the AUDIT LOGS panel should show that a TableDrilldown event has been logged.

Review Required Splunk Permissions & Capabilities

You must now ensure that user permissions are set correctly to ensure that you get the most out of Atlas. Instructions for setting these permissions can be found on the Atlas Capabilities & Permissions page.

Optional: Configure Distributed Search Groups

Distributed Search Groups (DSGs) enable Atlas users to search data over a specific set of search peers, such as all Search Heads or all Indexers.

DSGs cannot be configured in Splunk Web; the configuration file must be edited directly. Atlas Core comes with a distsearch.conf template to make setting up DSGs as simple as possible. In each stanza, the servers property consists of a comma-delimited list of servers in the following format: https://192.168.1.44:8089,https://192.168.1.62:8089,....

  1. Copy the distsearch.conf file in $SPLUNK_HOME/etc/apps/atlas_core/default/ to the /atlas_core/local folder.

  2. Edit the /local/distsearch.conf file by uncommenting and filling out each stanza that is relevant to your environment.

    Some of the applicable stanzas may include the following:

    [distributedSearch] - the base stanza

    If any search peers have been added using Splunk Web, this stanza will be populated with a comma-delimited list of these servers in the system-level distsearch.conf file located at $SPLUNK_HOME/etc/system/local/distsearch.conf

    • Copy the servers = entries from the [distributedSearch] stanza in /etc/system/local/distsearch.conf into (under) the same stanza in /etc/apps/atlas_core/local/distsearch.conf

    • Add all of the indexers to the servers list in this stanza. They are listed in the Search Peer page on Splunk Web

    • This stanza should now include all search peers shown in Splunk Web

[distributedSearch:ENV] - DSG for entire environment

This stanza allows the entire environment to be searched at once

  • Copy the server list from the base stanza onto this one, adding localhost:localhost to include the Atlas Search Head itself

[distributedSearch:DEF] - DSG to be searched by default

This is the only stanza with default = true

This stanza consists of localhost:localhost as well as all Indexers. This ensures standard search behavior, and prevents search requests from being sent to non-indexers

caution

Note that Indexer Discovery is not currently supported — any newly discovered Indexer Cluster Members will not automatically be added to either the base stanza or the DEF stanza and must be manually added. If you use indexer discovery, and do not care about sending search requests to non-indexers, it is recommended to exclude this group.

  • You can add servers into additional groups (stanzas) as needed for your environment. The distsearch.conf template in $SPLUNK_HOME/etc/apps/atlas_core/default contains examples of additional groups you can use if needed.

Remember: Do not edit the distsearch.conf file in the /atlas_core/default/ folder - any changes made there will be overwritten during an upgrade. All edits should be done in the distsearch.conf file in /etc/atlas_core/local.